Stupid coding tricks: Project Sekai score scanner

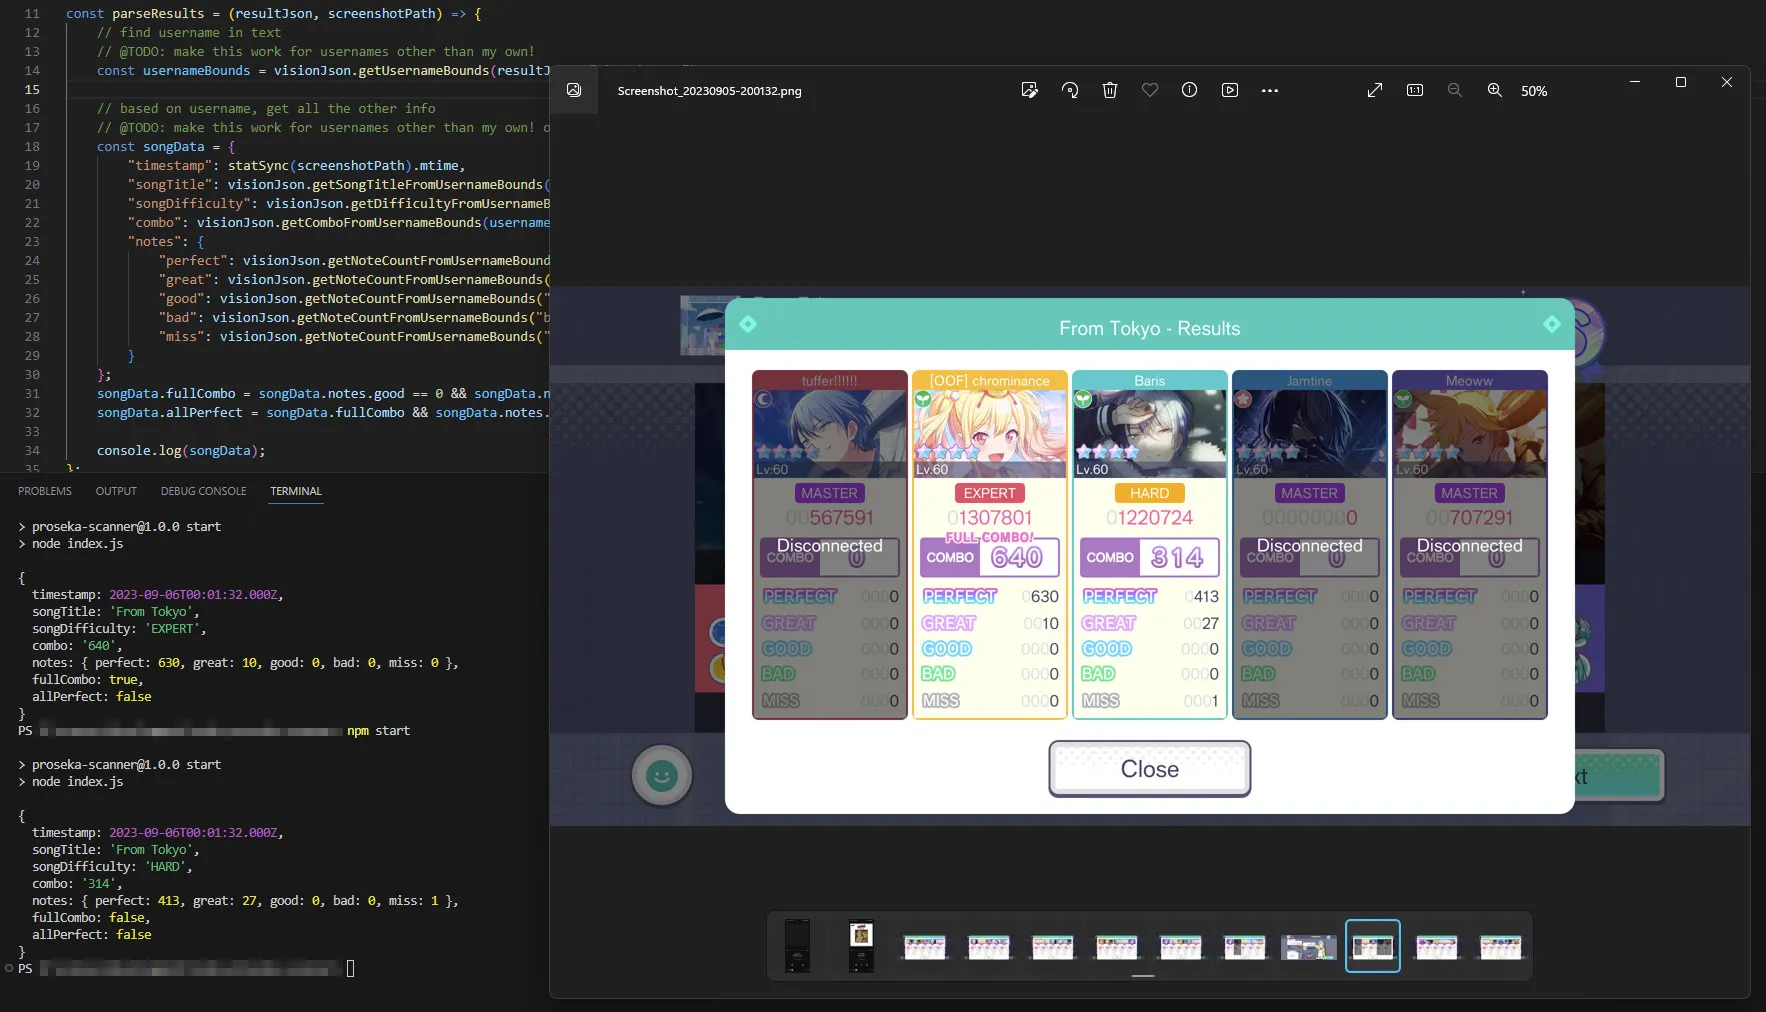
I finally got around to a project that’s been percolating in my brain for months now: scanning all the screenshots I’ve taken in Project Sekai: Colorful Stage to scrape the scoring data from them and track how I’ve improved over time.
Some context: Project Sekai: Colorful Stage is a free-to-play mobile rhythm game based on vocaloid songs. If you’ve played a rhythm game before, you pretty much know the drill, but the basic idea is that you listen to a song and try to tap notes that appear on the screen in time with the song’s rhythm. Once you’re done a song, you get graded based on how accurate your taps were, and then assigned a score based on that accuracy as well as other factors. Since a lot of those other factors have to do with stuff that isn’t skill-related (i.e. how much did you spend on this event’s gacha), the best way to determine your skill level is to focus on the accuracy stats.
Project Sekai is pretty good about tracking your progress for a particular song, up to a point; it’ll remember which songs you’ve gotten a Full Combo or All Perfect for, and at which difficulties. But beyond that, you don’t really have any good ways of tracking your improvements over time. The best you can do is take a screenshot of your scores after every game, but that’s not really the same as having a spreadsheet or database of your stats that you can turn into graphs or reports. But I LOVE graphs and reports. Let’s fix this.
Enter: Google Vision
The nice thing about screenshots is they should, in theory, be ideal candidates for optical character recognition, avoiding some of the pitfalls you get with, say, scanned documents. OCR has gotten very accessible as of late, and there are a few options open to anyone with a computer and a desire to tinker. Tesseract is an open-source OCR library that you can use to read text from images.
The only trouble with Tesseract is it’s still largely intended to be integrated into other software, and as such needs a fair amount of babysitting. You need to massage the images to improve recognition (i.e. turn them greyscale and up the contrast to make the text stand out from the background, or ideally isolate the text completely and remove the background altogether), and you’ll probably want to train the model a bit as well for better accuracy. All of this is a big upfront cost when you’re not even sure the basic idea will work.
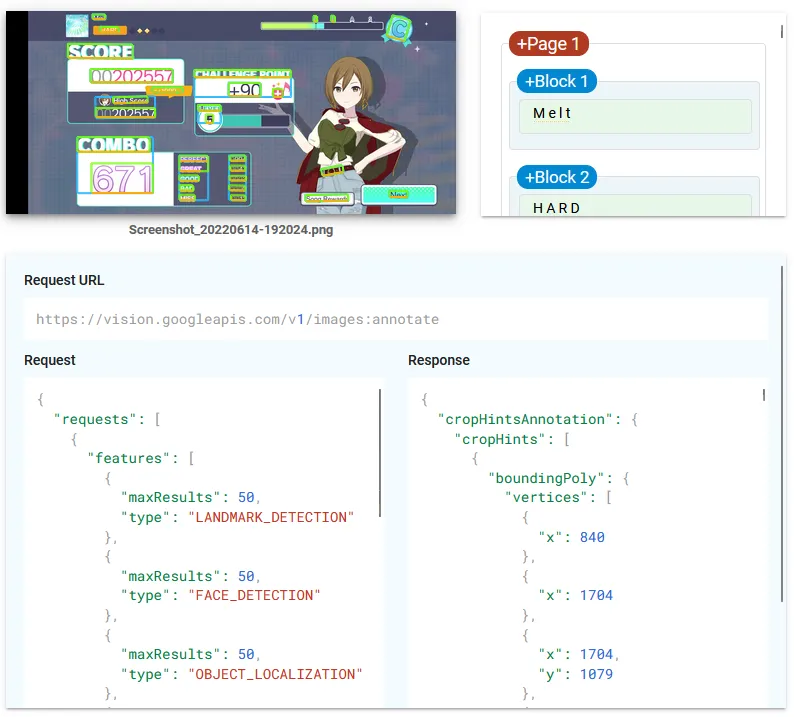
By contrast, Google’s Vision API is about as close to a no-fuss drag and drop solution as you can get at the moment. An I mean “drag-and-drop” pretty literally. Google’s own demo let me confirm that the basic concept would work great, but there were some speed bumps along the way.

The most obvious drawback is cost: you can scan 1000 images a month before Google starts charging you at a rate of $1.50 per 1000 images—definitely not something that’ll break the bank, but not free either. It also has a few quirks in how it detects text layouts—basically, it performs best with book pages, where text is in obvious paragraphs, and is much less successful in detecting how text is grouped together when in complex layouts like, say, the score display from Project Sekai. Luckily, its ability to scrape the actual text itself is quite good, rarely making mistakes when identifying letters and numbers. In other words, while Google Vision requires some hand-holding of its own to produce the right results, the basic concept works. I now have a script that can take screenshots, scrape them for data, and spit out a CSV I can import into a Google Sheets file for further processing/dataviz.
Making your own screenshot scanner
The whole script is in Javascript, run through Node.js. I’d originally wanted to do everything in Typescript but decided maybe that was one too many new things to be learning all at once. Unit tests are in Jasmine, as I wanted to use ES Modules instead of CommonJS (mostly because they’re suipposed to be the future, though Javascript’s “future” seems to change every six months so who knows). The basic strategy is as follows:
- Send a screenshot image to Google Vision and ask it to do a “document text detection” on it, which will scan the whole image for text and spit out a JSON file indicating everything it found and the bounding box coordinates for each piece of text;
- Using the JSON output, identify the presence/absence of specific text blocks to decide what kind of screenshot we’re looking at (is it a shot of group results, solo results, or something we can’t recognize as containing scores?);
- Once we’ve decided which layout we’re dealing with, try to identify the text blocks containing the bits of info we need (max combo, the note counts, song title and difficulty) by looking for elements we know will exist in the image and then guessing where the relevant bits of text are positioned relative to those anchor elements;
- Collate the data and dump it into a CSV for import into your database or spreadsheet of choice.
Funnily enough, there’s basically no OCR-related code in the script, because Google Vision handles all of it for us. We’re basically just running a whole bunch of JSONPath operations to filter out and sort the JSON objects for the text blocks we care about. Almost all of the actual logic is contained in steps 2 and 3, where we identify the layout in the image and then scrape the actual data. Most of the unit tests are there to make sure the JSONPath operations and additional processing can accommodate the different situations that come up in the images, especially problems that crop up in the wild with previous iterations of the script.
Results and next steps
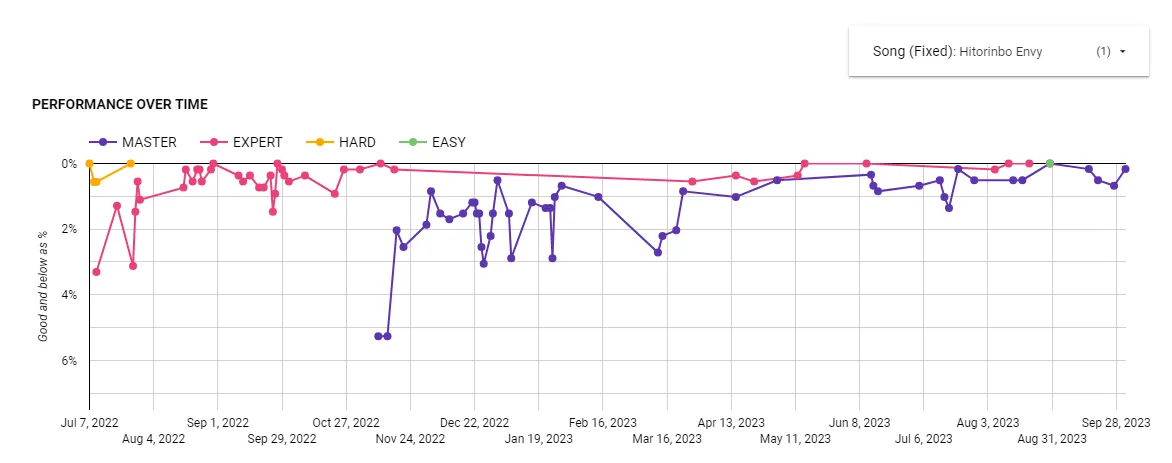
Once everything was up and running, the results were scarily close to what I envisioned before I even knew how I’d collect the stats in the first place. Here’s a graph showing every time I’ve played the song “Hitorinbo Envy.” Each line represents a different difficulty, and the x-axis is time. Each point shows how many notes I hit at ‘Good’ accuracy or worse; a Full Combo is when that number is 0 (the top of the chart). It’s really satisfying to see the lines climb closer to 0 as time progresses.

Aside from some quirks with song titles that will take some effort to diagnose, and potential weirdness in edge cases I haven’t really dealt with yet, this script does what I need it to after only two days of coding. Improvements I’d like to make in the immediate future:
- Switch to Tesseract. This would be experimental, of course, but if I can use Tesseract for all this instead then I can process as many images as I want without worrying that Google will send me an enormous bill in the future.
- More robust handling for different aspect ratios. Because you can play Project Sekai on most Android and iOS devices, this means a wide range of potential image sizes and aspect ratios. The method I use to determine where pieces of text are should be at least somewhat accommodating of this variety, but you won’t know for sure until you get actual screenshots taken across a wide variety of devices. The good news is that thanks to some Discord groups I’m in where people post their scores, there is a potential corpus to draw from; I don’t have to do this on my own.
- More robust handling of song titles and usernames. Due to Google Vision’s quirk of splitting words at breakpoints both obvious (whitespace) and not (brackets? hyphens, but only sometimes?), reconciling a full song title or username requires finding multiple text blocks in a row and smooshing them together. This causes all sorts of issues; for usernames it can be troublesome even figuring out which words belong to which usernames, and for song titles a common problem is deciding whether two separate text blocks need a space between them or not (ex. “Doctor”, ”=”, “Funk” and “Beat” should be concatenated to “Doctor=Funk Beat”, not “Doctor = Funk Beat”). Google Vision is also sometimes inconsistent in how it detects these pieces of text; sometimes the string “KING - Results”, from which we want “KING,” will instead show up as “KING- Results”, “KING -Results” or even “KING Results” even though that text should be rendered exactly the same way every time it appears.
Sidebar: JSONPath and its implementation in Node
JSONPath figures prominently in the script, and it’s one of those things that seems like it should just exist natively in Javascript, but doesn’t. It feels almost as fundamental to parsing large chunks of JSON as XPath is to doing the same in XML, but it feels like JSONPath is a bit more in the wilderness than XPath. Maybe that’s just me not having a ton of experience with the different implementations of either, though.
The key finding I needed for this project that it took me a while to figure out was that filter statements (filtering a collection of nodes in a JSON object by a condition) are seemingly native to the programming language used to execute the JSONPath statement. I’m not sure if this is specific to the Node library I’m using or if this is intended to be a general principle, because the original JSONPath spec doesn’t really say (or perhaps I’m not understanding a particular nuance in that spec; “expressions of the underlying scripting language” could in fact be saying exactly that). This means that some of the random documentation and tutorials scattered around the web may specify particular methods for filtering JSONPath collections that don’t actually work in Javascript, ex. ?(@.description in ["EASY", "NORMAL", "HARD"]) (which in Javascript using the jsonpath library, should actually be something like ?(["EASY", "NORMAL", "HARD"].includes(@.description))). It also incidentally makes debugging JSONPath statements inside Visual Studio Code a nightmare, because the available extensions that allow you to run JSONPath statements against open files clearly don’t use Javascript when interpreting filter statements, but it’s not really clear what language they DO use.